大家好,欢迎来到IT知识分享网。
接下来的文章都是基于黑马程序员的实战案例进行的一些理解和解析,在这里也给大家放上黑马程序员的视频链接供大家参考:黑马程序员
一、欢迎页面UI
(一)、页面布局
根据上图中的页面我们可以知道该页面整体是一个column布局,其中添加了文本和图片组成了这一界面
(二)、进行开发
1、进行准备工作
(1)、新建一个项目包
(2)、将文件导入到开发环境中
2、开始编写代码
(1)、新建一个名为welcome的文件
按照所分析的布局进行代码的编写
下面是主要部分的代码:
@Entry @Component struct WelcomePage { @State message: string = 'Hello World' build() { Column({space:10}) { //1.中央Slogan Row() { Image($r('app.media.home_slogan')).width(260) } .layoutWeight(1) //2.logo Image($r('app.media.home_logo')).width(150) //文字描述 Row(){ Text('黑马健康支持').fontSize(12).opacity(0.8).fontColor(Color.White) Text('IPv6') .fontSize(10).opacity(0.8).fontColor(Color.White) .border({style:BorderStyle.Solid, width:1,color:Color.White, radius:16}) .padding({left:5,right:5}) Text('网络').fontSize(12).opacity(0.8).fontColor(Color.White) } Text(`'减更多'是指黑马健康app希望通过软件工具的形式,帮助更多的用户实现身材管理`) .fontSize(10).opacity(0.6).fontColor(Color.White) Text('浙ICP备0000000号-36D') .fontSize(10).opacity(0.4).fontColor(Color.White) .margin({bottom:35}) } .width('100%') .height('100%') .backgroundColor($r('app.color.welcome_page_background')) } }(2)、新建一个函数用于编写文本属性
由于开始的时候要对文本进行多次调整,为方便修改便用一个单独的函数来编写。
代码:
@Extend(Text) function opacityWhiteText(opacity:number,fontSize:number=10){ .fontSize(fontSize) .opacity(opacity) .fontColor(Color.White) }至此,欢迎页面UI已经基本完成。
二、欢迎页面业务
(一)、整体思路
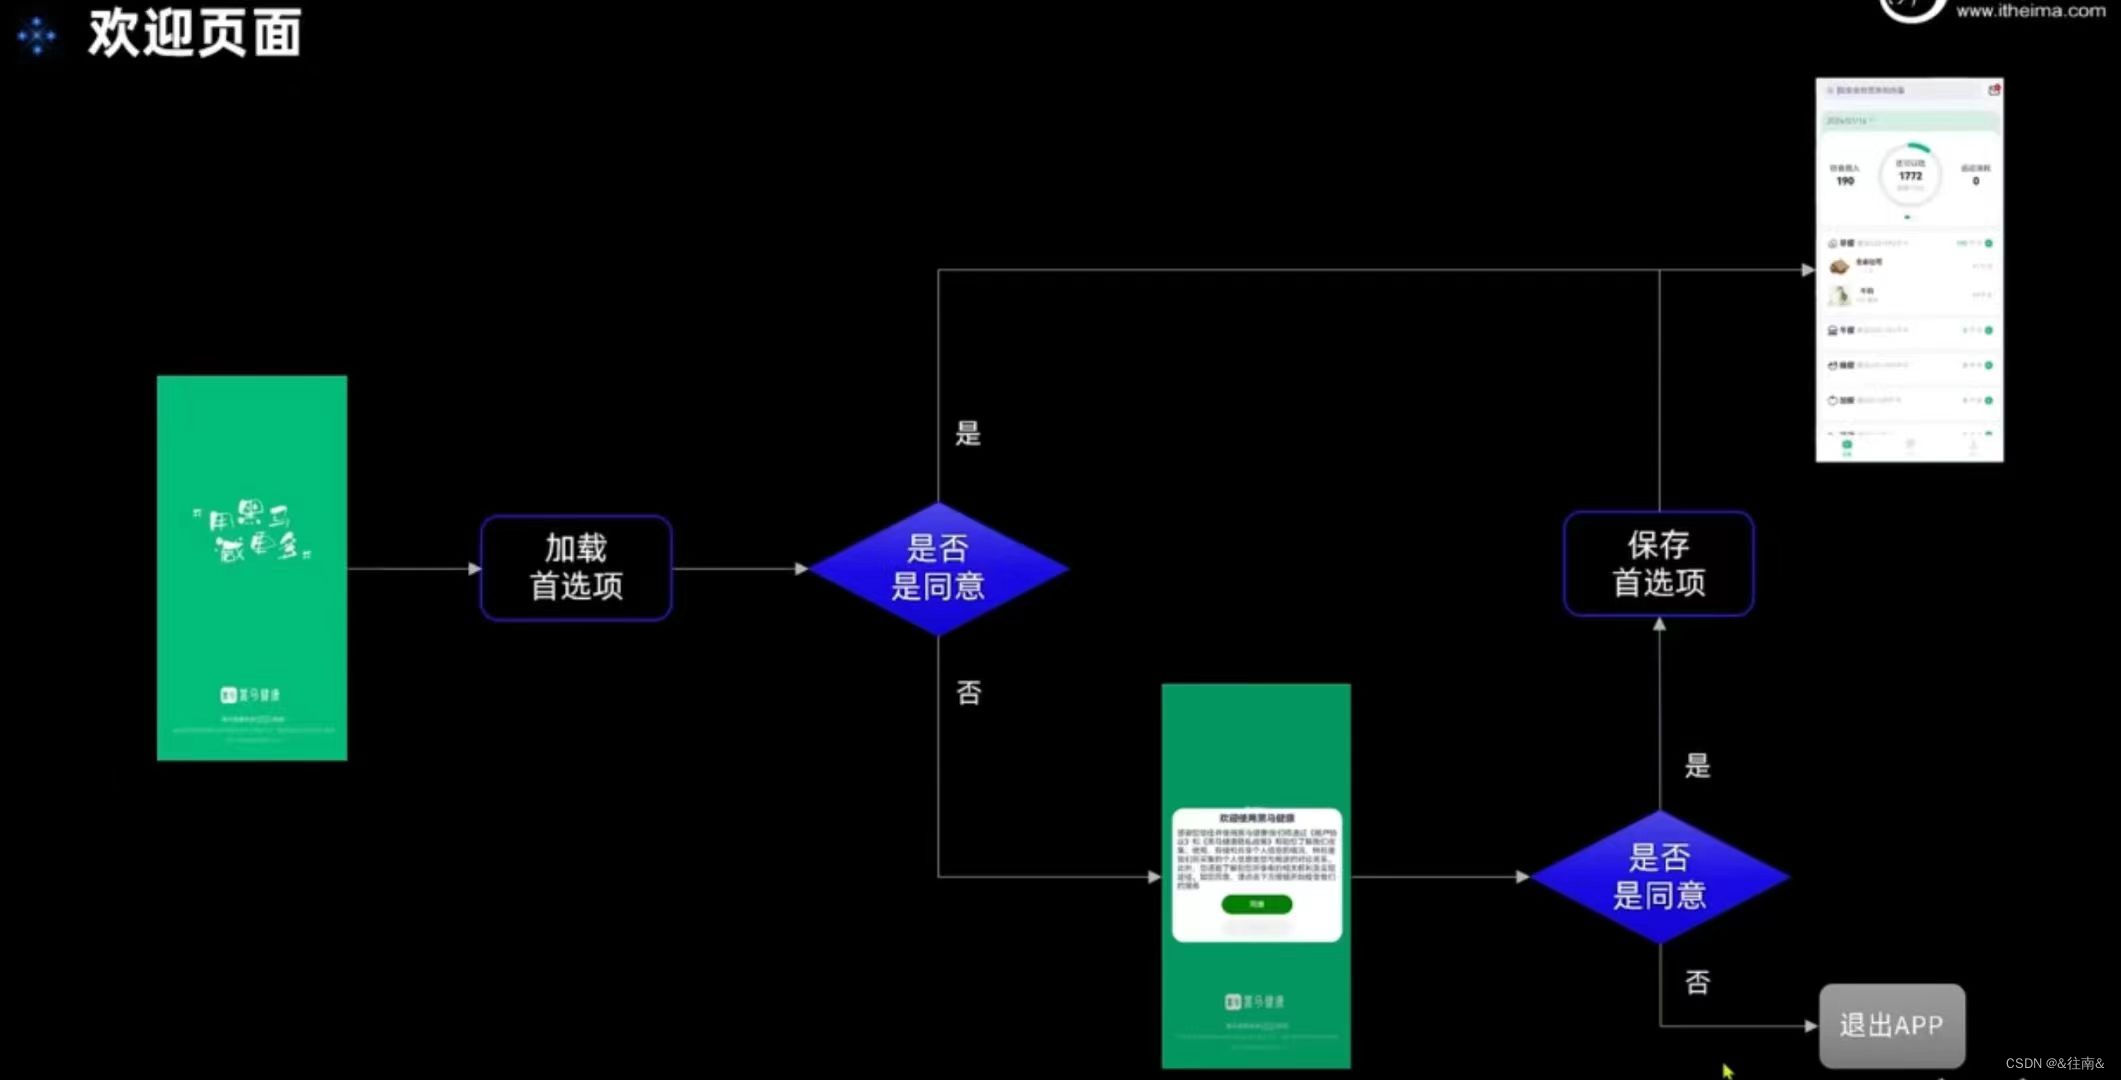
欢迎页面逻辑:运用用户首选项判断用户是否同意用户隐私协议,这时若是第一次进行选择是否同意便弹出弹窗进行询问,若同意则直接跳转到首页中。并且将同意的状态通过使用用户持久化保存,即下次打开时直接跳转到首页无需进行选择。相反若是不同意则自动退出APP。
逻辑图:
(二)、关键技术
在这一页面中主要运用了两个关键的技术需要我们了解:
1、用户首选项
2、自定义弹窗
(1)、使用@CustomDialog装饰器声明弹窗组件
@CustomDialog struct CustomDialogExample { controller: CustomDialogController build(){ Column(){ Text('弹窗内中的内容') .fontSize(20) } } }(2)、在页面中声明弹窗控制器,并利用其控制弹窗
@Entry @Component struct IndexPage { dialogController: CustomDialogController = new CustomDialogController({ builder:CustomDialogExample({/*此处可以传入弹窗需要的参数*/}),//使用自定义弹窗 ])//弹窗控制器 build() { Column(){ Button('打开') .onClick(()=> { this.dialogController.open()//利用弹窗控制器进行开关 }) } } }(三)、代码编写
1、构建弹窗
弹窗由三部分组成,由上到下分别是标题,内容和按钮。
代码:
@CustomDialog export default struct UserPrivacyDialog { controller: CustomDialogController//声明类型 confirm: () => void//同意逻辑 cancel: () => void//不同意逻辑 build() { Column({space: CommonConstants.SPACE_10}){ // 1.标题 Text($r('app.string.user_privacy_title'))//引用字符串 .fontSize(20) .fontWeight(CommonConstants.FONT_WEIGHT_700) // 2.内容 Text($r('app.string.user_privacy_content')) // 3.按钮 Button($r('app.string.agree_label')) .width(150) .backgroundColor($r('app.color.primary_color')) .onClick(() => { this.confirm() this.controller.close() }) Button($r('app.string.refuse_label')) .width(150) .backgroundColor($r('app.color.lightest_primary_color')) .fontColor($r('app.color.light_gray')) .onClick(() => { this.cancel() this.controller.close() }) } .width('100%') .padding(10) } } 由于之前导入了这些素材,可以直接引用。
2、在欢迎页面中使用对话框
(1)、声明对话框
controller: CustomDialogController = new CustomDialogController({ builder: UserPrivacyDialog({ //传入的参数 confirm: () => this.onConfirm(), cancel: () => this.exitApp() }) })(2)、设置弹窗出现的时间
我们设置它在页面一开始时就弹出对话框,并且在这个页面中需要同时实现的还有用户首选项,前面我们已经导入了黑马程序员的素材可以直接使用

首选项代码:
import preferences from '@ohos.data.preferences'; import { CommonConstants } from '../constants/CommonConstants'; import Logger from './Logger'; class PreferenceUtil{ private pref: preferences.Preferences async loadPreference(context){ try { // 加载preferences this.pref = await preferences.getPreferences(context, CommonConstants.H_STORE) Logger.debug(`加载Preferences[${CommonConstants.H_STORE}]成功`) } catch (e) { Logger.debug(`加载Preferences[${CommonConstants.H_STORE}]失败`, JSON.stringify(e)) } } async putPreferenceValue(key: string, value: preferences.ValueType){ if (!this.pref) { Logger.debug(`Preferences[${CommonConstants.H_STORE}]尚未初始化!`) return } try { // 写入数据 await this.pref.put(key, value) // 刷盘 await this.pref.flush() Logger.debug(`保存Preferences[${key} = ${value}]成功`) } catch (e) { Logger.debug(`保存Preferences[${key} = ${value}]失败`, JSON.stringify(e)) } } async getPreferenceValue(key: string, defaultValue: preferences.ValueType){ if (!this.pref) { Logger.debug(`Preferences[${CommonConstants.H_STORE}]尚未初始化!`) return } try { // 读数据 let value = await this.pref.get(key, defaultValue) Logger.debug(`读取Preferences[${key} = ${value}]成功`) return value } catch (e) { Logger.debug(`读取Preferences[${key}]失败`, JSON.stringify(e)) } } } const preferenceUtil = new PreferenceUtil() export default preferenceUtil as PreferenceUtil在启动时加载loadPreference函数,这个步骤在onCreate生命周期钩子中:
onCreate(want, launchParam) { 加载用户首选项 PreferenceUtil.loadPreference(this.context) hilog.info(0x0000, 'testTag', '%{public}s', 'Ability onCreate'); } 在弹窗出现后,我们就需要判断用户是否会同意:
async aboutToAppear(){//异步函数,它可以在执行过程中暂停,并在稍后的时间点继续执行。async 函数的返回值是一个 Promise 对象,用于表示异步操作的结果。 // 1.加载首选项 let isAgree = await PreferenceUtil.getPreferenceValue(PREF_KEY, false)//默认为不弹窗,await异步读取 // 2.判断是否同意 if(isAgree){ // 2.1.同意,跳转首页 this.jumpToIndex() }else{ // 2.2.不同意,弹窗 this.controller.open() } }其中跳转到首页单独写了一个函数方便调用:
jumpToIndex(){//跳转到首页 setTimeout(() => { router.replaceUrl({//直接压栈破坏 url: 'pages/Index' }) }, 1000)//延迟跳转,缓冲数据加载及让用户看会首页 }(3)、用户点击同意
onConfirm(){ // 1.保存首选项 PreferenceUtil.putPreferenceValue(PREF_KEY, true) // 2.跳转到首页 this.jumpToIndex() }(4)、用户点击不同意
当用户点击不同意后我们需要关闭软件,也就是退出App
context = getContext(this) as common.UIAbilityContext//上下文 controller: CustomDialogController = new CustomDialogController({ builder: UserPrivacyDialog({//传入的参数 confirm: () => this.onConfirm(), cancel: () => this.exitApp() }) }) exitApp(){ // 退出APP this.context.terminateSelf() }(5)、在Entry Ability中修改默认加载页面为Welcome页面
windowStage.loadContent('pages/WelcomePage', (err, data) => { if (err.code) { hilog.error(0x0000, 'testTag', 'Failed to load the content. Cause: %{public}s', JSON.stringify(err) ?? ''); return; } hilog.info(0x0000, 'testTag', 'Succeeded in loading the content. Data: %{public}s', JSON.stringify(data) ?? ''); });(四)、测试逻辑功能
打开鸿蒙模拟器运行一下:
经过测试我们的页面完全符合预期的标准,在点击同意后再次进入的时候弹窗将不再弹出
免责声明:本站所有文章内容,图片,视频等均是来源于用户投稿和互联网及文摘转载整编而成,不代表本站观点,不承担相关法律责任。其著作权各归其原作者或其出版社所有。如发现本站有涉嫌抄袭侵权/违法违规的内容,侵犯到您的权益,请在线联系站长,一经查实,本站将立刻删除。 本文来自网络,若有侵权,请联系删除,如若转载,请注明出处:https://haidsoft.com/144036.html


