大家好,欢迎来到IT知识分享网。
一、本地上传
①上传文件到本地
1 前端:
前端上传文件三要素:
I form 表单 method 必须是 post
II form 表单 enctype 属性必须是 multipart/form-data
III input 的 tpye 属性必须是 file
2 后端:
uploadController:
① 接受前端传递的参数,其中文件用 MultipartFile 类型接收,如果已经给接收文件起好名了发现傻逼前端名起的不一样,可以使用 @RequestParam(“前端的名”) 注解来接收前端传过来的值
② file 的几个api
System.out.println("这个是参数名"+file.getName()); System.out.println("这个是源文件的名字"+file.getOriginalFilename()); System.out.println("这个是文件大小"+file.getSize()); System.out.println("这个是文件内容的类型"+file.getContentType()); System.out.println("这个是参数的数据类型"+file.getResource()); System.out.println("这个是输入流"+file.getInputStream());③ 存储到本地的方法:首先获取原始文件名,然后通过当前类的类加载器来获取存放的路径,将文件名和路径拼起来,拼成一个最终的文件,通过 transferTo() 方法来存储。
@PostMapping("/upload") public ResultData upload(String username, String password, MultipartFile file) throws IOException { // 获取原始的文件名 String newFile = file.getOriginalFilename(); // 此时会将文件存在一个临时的文件中,项目关闭后就没了 // 需要将他复制到本地目录下 // 将文件存储在服务器的磁盘目录下 // 通过找到当前类的类加载器中的resource来获取存放路径 URL resource = this.getClass().getClassLoader().getResource("static/image/"); String path = resource.getPath(); File file1 = new File(path + newFile); file.transferTo(file1); return ResultData.success(); }④ 多次测试发现文件名一致回覆盖原有文件
解决方法:使用uuid的方式来解决文件名一致的问题, 新的文件名由uuid生成的随机数.原文件的扩展名(原文件的扩展名通过分割最后一次出现的.来获取)。
@PostMapping("/upload") public ResultData upload(String username, String password, MultipartFile file) throws IOException { // 获取原始的文件名 String oldFile = file.getOriginalFilename(); // 此时会将文件存在一个临时的文件中,项目关闭后就没了 // 需要将他复制到本地目录下 // 将文件存储在服务器的磁盘目录下 // 通过找到当前类的类加载器中的resource来获取存放路径 URL resource = this.getClass().getClassLoader().getResource("static/image/"); // 多次测试发现文件名一致回覆盖原有文件 // 使用uuid的方式来解决文件名一致的问题, 新的文件名由uuid生成的随机数.原文件的扩展名(原文件的扩展名通过分割最后一次出现的.来获取) String newFile = UUID.randomUUID().toString() + oldFile.substring(oldFile.lastIndexOf(".")); String path = resource.getPath(); File file1 = new File(path + newFile); file.transferTo(file1); return ResultData.success(); }⑤ 当需要上传的文件大小过大时需要在 application.yml 更改配置
spring: servlet: multipart: #配置单个文件最大上传大小 默认为1MB max-file-size: 10MB #配置单个请求最大上传大小(一次请求可以上传多个文件) 默认为10MB max-request-size: 100MB⑥ 如果需要指定文件类型 也可以去通过截取加拼接等方式进行判断 注意:为了避免空指针异常将写死的东西放在外面
if ("jpeg".contains(file.getContentType())){}二、云存储
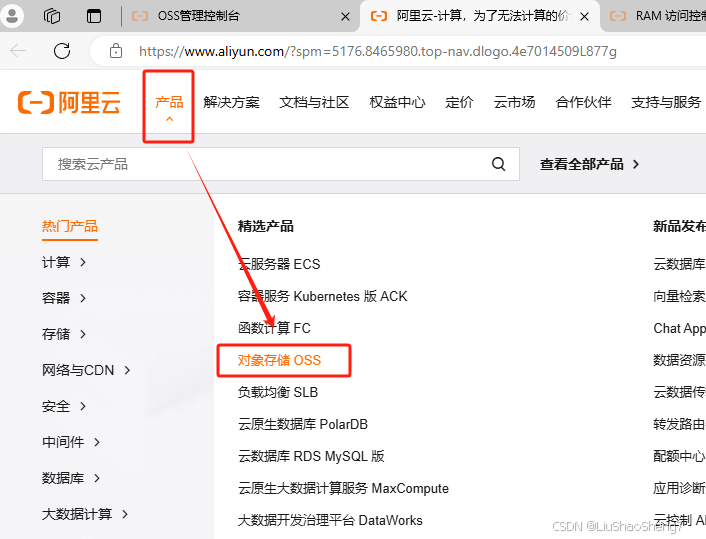
① 进入阿里云平台
https://click.aliyun.com/se//
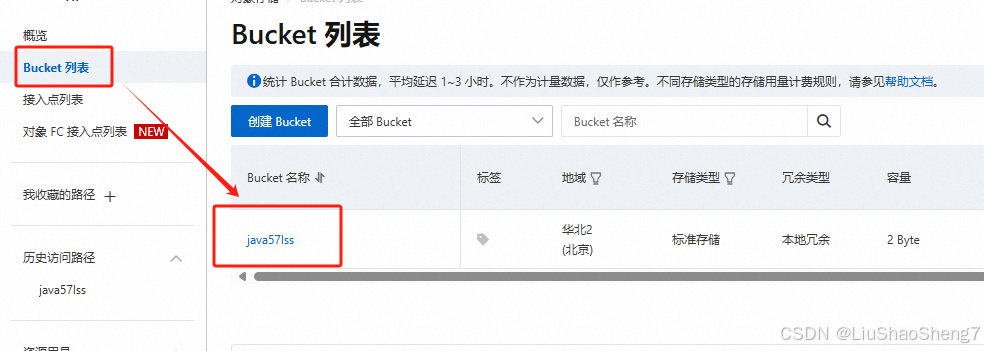
② 使用OSS
1 导入依赖
<dependency> <groupId>com.aliyun.oss</groupId> <artifactId>aliyun-sdk-oss</artifactId> <version>3.17.4</version> </dependency>2 简简单单的实现一个上传功能
package com.expamle; import com.aliyun.oss.ClientException; import com.aliyun.oss.OSS; import com.aliyun.oss.OSSClientBuilder; import com.aliyun.oss.OSSException; import com.aliyun.oss.model.PutObjectRequest; import com.aliyun.oss.model.PutObjectResult; import java.io.FileInputStream; import java.io.InputStream; public class demo { public static void main(String[] args) throws Exception { // Endpoint以华东1(杭州)为例,其它Region请按实际情况填写。(地域节点) 这改成自己用的节点 String endpoint = "oss-cn-beijing.aliyuncs.com"; // 从环境变量中获取访问凭证。运行本代码示例之前,请确保已设置环境变量OSS_ACCESS_KEY_ID和OSS_ACCESS_KEY_SECRET。 // EnvironmentVariableCredentialsProvider credentialsProvider = CredentialsProviderFactory.newEnvironmentVariableCredentialsProvider(); String accessKeyId = "LTAI5tFq5EQxbkkx4R9E9mBu"; String accessKeySecret = "Fvq1Ls8MAAjI3vcfiZ27dHsFEnB8zI"; // 填写Bucket名称,例如examplebucket。 Bukcet创建时的名字 String bucketName = "java57lss"; // 填写Object完整路径,完整路径中不能包含Bucket名称,例如exampledir/exampleobject.txt。 要上传的文件名字 String objectName = "aa.txt"; // 填写本地文件的完整路径,例如D:\\localpath\\examplefile.txt。 // 如果未指定本地路径,则默认从示例程序所属项目对应本地路径中上传文件流。 String filePath= "D:\\Java57\\0708\\Java57_boss\\src\\main\\resources\\static\\image\\aa.txt"; // 创建OSSClient实例。 OSS ossClient = new OSSClientBuilder().build(endpoint,accessKeyId,accessKeySecret); try { InputStream inputStream = new FileInputStream(filePath); // 创建PutObjectRequest对象。 PutObjectRequest putObjectRequest = new PutObjectRequest(bucketName, objectName, inputStream); // 创建PutObject请求。 PutObjectResult result = ossClient.putObject(putObjectRequest); } catch (OSSException oe) { System.out.println("Caught an OSSException, which means your request made it to OSS, " + "but was rejected with an error response for some reason."); System.out.println("Error Message:" + oe.getErrorMessage()); System.out.println("Error Code:" + oe.getErrorCode()); System.out.println("Request ID:" + oe.getRequestId()); System.out.println("Host ID:" + oe.getHostId()); } catch (ClientException ce) { System.out.println("Caught an ClientException, which means the client encountered " + "a serious internal problem while trying to communicate with OSS, " + "such as not being able to access the network."); System.out.println("Error Message:" + ce.getMessage()); } finally { if (ossClient != null) { ossClient.shutdown(); } } } }需要改的参数
endpoint:oss区域,参考:首页->对象存储->操作指南->访问域名(Endpoint)-> 访问域名和数据中心
accessKeyId:阿里云账号AccessKey
accessKeySecret:阿里云账号AccessKey对应的秘钥
bucketName:Bucket名称
objectName:对象名称,在Bucket中存储的对象的名称
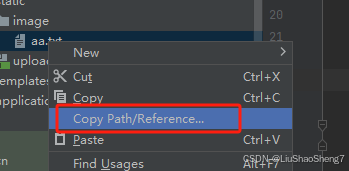
filePath:文件路径
③ 封装工具类
import com.aliyun.oss.OSS; import com.aliyun.oss.OSSClientBuilder; import org.springframework.stereotype.Component; import org.springframework.web.multipart.MultipartFile; import java.io.IOException; import java.io.InputStream; import java.util.UUID; @Component public class AliOSSUtils { String endpoint = "https://oss-cn-beijing.aliyuncs.com"; String accessKeyId = "LTAI5tFq5EQxbkkx4R9E9mBu"; String accessKeySecret = "Fvq1Ls8MAAjI3vcfiZ27dHsFEnB8zI"; String bucketName = "java57lss"; / * 实现上传图片到OSS */ public String upload(MultipartFile file) throws Exception { // 获取用户上传问价的输入流 InputStream inputStream = file.getInputStream(); // 防止覆盖 String oldFile = file.getOriginalFilename(); String newFile = UUID.randomUUID().toString() + oldFile.substring(oldFile.lastIndexOf(".")); // 上传到OSS OSS oss = new OSSClientBuilder().build(endpoint,accessKeyId,accessKeySecret); oss.putObject(bucketName,newFile,inputStream); // 获取选择文件的路径 String url = endpoint.split("//")[0] + "//" + bucketName + "." + endpoint.split("//")[1] + "/" + newFile; // 关闭oss oss.shutdown(); return url; } }④修改后的UploadController
@Autowired private AliOSSUtils aliOSSUtils; @PostMapping("/upload") public ResultData upload(String username, String password, MultipartFile file) throws Exception { String url = aliOSSUtils.upload(file); return ResultData.success("修改成功" + url); }三、 配置文件
写utils的时候发现endpoint,accessKeyId,accessKeySecret,bucketName 可能会大量重复为了避免硬编码和难维护的问题所以将他们封装到配置文件中。
① 引入第三方配置文件
1 oss.properties
oss.endpoint=https://oss-cn-beijing.aliyuncs.com oss.accessKeyId=LTAI5tFq5EQxbkkx4R9E9mBu oss.accessKeySecret=Fvq1Ls8MAAjI3vcfiZ27dHsFEnB8zI oss.bucketName=java57lss2 utils
使用value注解可以解析单一配置文件内容,
@Component public class AliOSSUtils { @Value("${oss.oss.endpoint}") private String endpoint; @Value("${oss.oss.accessKeyId}") private String accessKeyId; @Value("${oss.oss.accessKeySecret}") private String accessKeySecret; @Value("${oss.oss.bucketName}") private String bucketName; }使用PropertySource可以对所有加上注解
@PropertySource("classpath:oss.properties") @Component public class AliOSSUtils { @Value("${oss.endpoint}") private String endpoint; @Value("${oss.accessKeyId}") private String accessKeyId; @Value("${oss.accessKeySecret}") private String accessKeySecret; @Value("${oss.bucketName}") private String bucketName; }②在springboot配置文件中编写
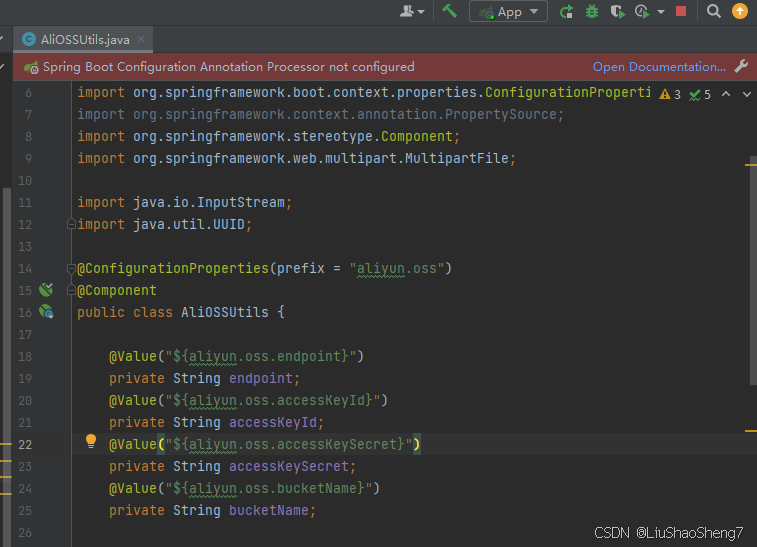
aliyun: oss: endpoint:https: https://oss-cn-beijing.aliyuncs.com accessKeyId: LTAI5tFq5EQxbkkx4R9E9mBu accessKeySecret: Fvq1Ls8MAAjI3vcfiZ27dHsFEnB8zI bucketName: java57lss@Value("${aliyun.oss.endpoint}") private String endpoint; @Value("${aliyun.oss.accessKeyId}") private String accessKeyId; @Value("${aliyun.oss.accessKeySecret}") private String accessKeySecret; @Value("${aliyun.oss.bucketName}") private String bucketName;会发现这里aliyun.oss. 一直在重复所以使用注解@ConfigurationProperties来简化
在pom.xml导入依赖可以使上面的红框变灰
<dependency> <groupId>org.springframework.boot</groupId> <artifactId>spring-boot-configuration-processor</artifactId> </dependency>免责声明:本站所有文章内容,图片,视频等均是来源于用户投稿和互联网及文摘转载整编而成,不代表本站观点,不承担相关法律责任。其著作权各归其原作者或其出版社所有。如发现本站有涉嫌抄袭侵权/违法违规的内容,侵犯到您的权益,请在线联系站长,一经查实,本站将立刻删除。 本文来自网络,若有侵权,请联系删除,如若转载,请注明出处:https://haidsoft.com/118487.html


