大家好,欢迎来到IT知识分享网。
文章目录
一、GUI-AWT
1. AWT介绍
- 什么是Awt
- Awt是Java中的抽象组键窗口工具包,用来是实现Java中的图形界面化
- Awt包中的元素
- 容器
- 布局管理器
- 组件
- 事件监听
- Awt特点
- 是重量级控件,使用了大量的Windows函数
- 可移植性差,只能在Windows平台下执行
- 在Windows平台下执行的速度快,可以调用Windows的函数
2. 容器
1)窗口 Frame
- 作用
- 一个带有标题、边框的顶层窗口
- 可以设置窗口的大小、位置、背景色、布局、可见性等
- 作为容器使用,可以将其他的组件、面板等排布在窗口上
- 方法
- public Frame(String title)
- 构造方法,创建一个有指定标题的窗口,初始不可见
- setTitle(String title)
- 设置窗口的标题
- setLocation(x,y)
- 设置窗口的位置
- setResizable(boolean resizable)
- 设置窗口是否可以被拉伸
- setSize(widht,height)
- 设置窗口的大小
- setBackground(Color color)
- 设置窗口的背景颜色
- setVisible(boolean b)
- 设置窗口的可见性
- add()
- 给窗口中添加元素
- public Frame(String title)
- 代码示例
- 创建一个窗口
public class FrameWindow { //我的第一个图形界面化窗口 public static void main(String[] args) { //创建一个图形界面化窗口 Frame frame = new Frame("我的第一个图形界面化窗口"); //设置位置 frame.setLocation(100, 100); //设置窗口的大小 frame.setSize(500, 500); //设置界面可见性 frame.setVisible(true); //设置界面的背景颜色 frame.setBackground(new Color(243, 21, 12)); //设置界面的位置固定,界面是否可以拉缩 frame.setResizable(true); } }- 创建多个窗口
public class FrameWindow2 {
     //封装自己的Frame子类,用来实现窗体 public static void main(String[] args) {
      MyFrame frame1 = new MyFrame(100, 100, 200, 200, Color.red); MyFrame frame2 = new MyFrame(100, 300, 200, 200, Color.blue); MyFrame frame3 = new MyFrame(300, 100, 200, 200, Color.yellow); MyFrame frame4 = new MyFrame(300, 300, 200, 200, Color.ORANGE); } } class MyFrame extends Frame {
      public MyFrame(int x, int y, int w, int h, Color color) {
      setBounds(x, y, w, h);//设置位置、窗口大小 setBackground(color);//设置窗口颜色 setVisible(true);//设置窗口可见 } }
2)面板 Panel
- 作用
- 简单的容器类,提供了一个容纳其他组件的空间,也可以容纳其他的面板
- 面板默认为流式布局
- 不能单独存在,必须依靠于其他的容器,也就是说,面板要添加到其他容器中进行使用
- 在具体使用时,不是直接往窗口上添加元素,而是先将组件添加进面板上,使用面板进行布局,将面板添加进窗口
- 方法
- Panel()
- 构造方法,创建一个默认布局为流式布局的面板
- Panel(LayoutManager layout)
- 创建一个指定布局的面板
- setLayout(LayoutManager layout)
- 设置布局
- Panel()
- 代码示例
- 创建一个面板,并将面板添加进容器中
public class PanelExercise1 {
     //面板练习 //面板比窗口的概念小一点,不能单独存在,要依附于窗口才能存在 //窗口本身就是一个容器,面板也是,可以添加进窗口内,作为较小的容器来使用 public static void main(String[] args) {
      //创建窗口与面板 Frame frame = new Frame("Java面板联系");//创建窗口 Panel panel = new Panel();//创建面板 //设置窗口的布局 frame.setLayout(null);//设置为绝对布局,使用各个组件的位置进行排布 //设置窗口的属性 frame.setBackground(Color.red); frame.setBounds(100, 100, 500, 500); frame.setVisible(true); //设置面板的属性 panel.setBackground(Color.yellow); panel.setBounds(150, 150, 300, 300); panel.setVisible(true); //将面板放进窗口中 frame.add(panel); //设置监听事件,解决窗口创建后关闭按钮问题 //使用WindowListener接口的子实现类WindowAdapter的对象作为参数 //重写对应点击关闭按钮事件的windowClosing()方法,完成关闭窗口 frame.addWindowListener(new WindowAdapter() {
      @Override public void windowClosing(WindowEvent e) {
      System.exit(0); } }); } }
3. 组件
1)Button
- 一个标记按钮,当按钮被点击时可以触发一些事件
2)Label
- 一个用来描述信息的标签
3)TextField
- 一个文本组件,允许单行文本的输入,当按下回车键时表示输入结束
4. 布局管理器
1)流式布局 FlowLayout
- 作用
- 使用在窗口、面板等容器上,用来控制容器上组件的布局方式
- 在一个方向上排列组件
- 方法及属性
- FlowLayout()
- 创建一个默认为中心对齐的流式布局管理器(对象)
- 属性
- CENTER:中间
- LEADING:底部
- LEFT:左边
- RIGHT:右边
- TRAILING:顶部
- FlowLayout()
- 代码示例
- 给窗口中添加5个Button按钮,使用流式布局
public class flowLayouts {
     //布局管理器-流式布局 public static void main(String[] args) {
      //创建窗口 Frame frame = new Frame("流式布局练习"); //窗口属性设置 frame.setBounds(100, 100, 500, 500); frame.setBackground(Color.red); frame.setVisible(true); //窗口布局设置 //FlowLayout()构造方法中可以传入具体的参数,来控制组键的位置 //例如FlowLayout.LEFT是向左对齐、还有RIGHT、CENTER等 frame.setLayout(new FlowLayout(FlowLayout.CENTER));//将窗口的布局设置为流式布局 //创建Button按钮 Button button1 = new Button("Button1"); Button button2 = new Button("Button2"); Button button3 = new Button("Button3"); Button button4 = new Button("Button4"); Button button5 = new Button("Button5"); //将Button按钮添加进窗口中 frame.add(button1); frame.add(button2); frame.add(button3); frame.add(button4); frame.add(button5); //设置监听事件关闭窗口 frame.addWindowListener(new WindowAdapter() {
      @Override public void windowClosing(WindowEvent e) {
      System.exit(0); } }); } }
2)边框布局 BorderLayout
- 作用
- 控制容器上组件的布局方式
- 将容器划分为东、南、西、北、中五个区域,使用EAST、WEST、NORTH、SOUTH、CENTER五个静态常量进行设置
- 可以根据容器的大小和组件的大小自动拉伸组件,以填充区域
- 方法
- BorderLayout()
- 创建一个没有间隙的边框布局
- BorderLayout(int hgap, int vgap)
- 创建一个有指定间隙的边框布局
- BorderLayout()
- 代码示例
- 创建一个窗口,在东南西北中五个区域分别填充一个Button按钮
public class BorderLayouts {
     //东西南北中,边框布局 //East West North South public static void main(String[] args) {
      //创建窗口 Frame frame = new Frame("边框布局练习"); //设置窗口属性 frame.setBounds(100, 100, 500, 500); frame.setBackground(Color.yellow); frame.setVisible(true); //设置窗口的布局 frame.setLayout(new BorderLayout());//边框布局 //创建Button按钮 Button east = new Button("East"); Button west = new Button("West"); Button north = new Button("North"); Button south = new Button("South"); Button center = new Button("Centre"); //将按钮按边框布局填放进窗口中 frame.add(east, BorderLayout.EAST); frame.add(west, BorderLayout.WEST); frame.add(north, BorderLayout.NORTH); frame.add(south, BorderLayout.SOUTH); frame.add(center, BorderLayout.CENTER); //设置窗体关闭按钮 frame.addWindowListener(new WindowAdapter() {
      @Override public void windowClosing(WindowEvent e) {
      System.exit(0); } }); } }
3)表格布局 GridLayout
- 作用
- 控制容器上组件的布局方式
- 将容器划分为指定行列的大小相等的矩阵网格,每一个组件都放在矩形网格中
- 方法
- GridLayout()
- 创建一个默认为一行的表格布局
- GridLayout(int rows, int cols)
- 创建一个具有指定行和列的表格布局
- GridLayout(int rows, int cols, int hgap, int vgap)
- 创建一个具有指定行和列的表格布局,表格之间有指定的间隙
- GridLayout()
- 代码示例
- 创建一个两行三列的表格
public class GridLayouts {
     //表格布局练习 public static void main(String[] args) {
      //创建并设置窗口属性 Frame frame = new Frame("表格布局练习"); frame.setBounds(100, 100, 500, 500); frame.setVisible(true); //设置窗口的布局 frame.setLayout(new GridLayout(2, 3));//表格布局,两行三列 //创建Button按钮 Button button1 = new Button("Button1"); Button button2 = new Button("Button2"); Button button3 = new Button("Button3"); Button button4 = new Button("Button4"); Button button5 = new Button("Button5"); Button button6 = new Button("Button6"); //添加Button按钮到窗口 frame.add(button1); frame.add(button2); frame.add(button3); frame.add(button4); frame.add(button5); frame.add(button6); //关闭按钮设置 frame.addWindowListener(new WindowAdapter() {
      @Override public void windowClosing(WindowEvent e) {
      System.exit(0); } }); } }
4)布局容器的综合练习
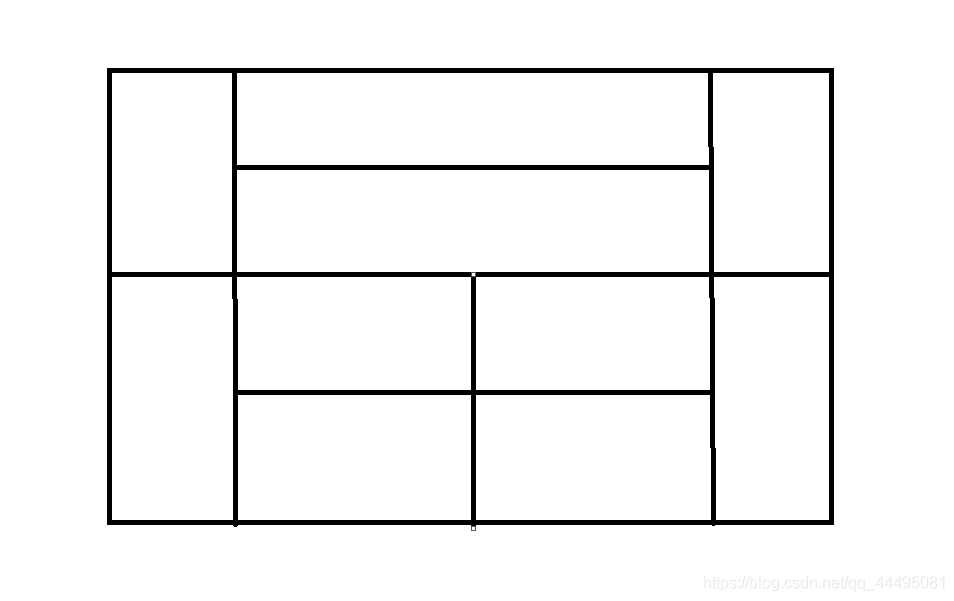
- 创建以下图案的窗口
public class LayoutTotalExercise {
   //窗口布局综合练习 public static void main(String[] args) {
    / * 1.总体上来说是上下两部分两行一列的表格布局 * 2.上下部分分别是左中右三部分的边框布局 * 3.上下部分的中间分别是两行一列的表格布局与两行两列的表格布局 * 4.可以将各部分分别先放进面板中,再将面板组合填充进窗口中 */ //定义并设置窗口 Frame frame = new Frame("窗口布局的综合练习"); frame.setBounds(100, 100, 500, 500); frame.setVisible(true); //设置窗口的布局 frame.setLayout(new GridLayout(2, 1));//分为上下两部分,两行一列 //创建四个面板 Panel panel1 = new Panel();//上半部分的面板 Panel panel2 = new Panel();//上半部分中间的面板 Panel panel3 = new Panel();//下半部分的面板 Panel panel4 = new Panel();//下半部分中间的面板 //给上半部分的面板填充 panel1.setLayout(new BorderLayout());//上半部分整体为左中右的边框布局 panel1.add(new Button("Button-UP-West"), BorderLayout.WEST); panel1.add(panel2, BorderLayout.CENTER); panel1.add(new Button("Button-UP-East"), BorderLayout.EAST); panel2.setLayout(new GridLayout(2, 1)); panel2.add(new Button("Button-UP-Center-UP")); panel2.add(new Button("Button-UP-Center-Down")); //给下半部分的面板填充 panel3.setLayout(new BorderLayout());//下半部分整体也为左中右的边框布局 panel3.add(new Button("Button-Down-West"), BorderLayout.WEST); panel3.add(panel4, BorderLayout.CENTER); panel3.add(new Button("Button-Down-East"), BorderLayout.EAST); panel4.setLayout(new GridLayout(2, 2)); panel4.add(new Button("Button-Down-Center-1")); panel4.add(new Button("Button-Down-Center-2")); panel4.add(new Button("Button-Down-Center-3")); panel4.add(new Button("Button-Down-Center-4")); //将上下两部分放进窗口中 frame.add(panel1); frame.add(panel3); //设置关闭窗口 frame.addWindowListener(new WindowAdapter() {
    @Override public void windowClosing(WindowEvent e) {
    System.exit(0); } }); } }
5. 事件监听
1)ActionListener 按钮监听
- 描述
- 用于接收动作事件的监听器,调用组件的addActionListener()方法,当事件被触发时,这个对象的actionPerformed()方法就被调用
- 重写的方法内部用来描述事件触发时发生的动作
- 代码示例
- 编写一个窗口,当窗口中的Button按钮被点击,向控制台输出点击提示信息
public class ButtonActionListeners { //Button事件监听练习 public static void main(String[] args) { //创建并设置窗口与Button按钮 Frame frame = new Frame("Button事件监听的练习"); frame.setBounds(100, 100, 500, 500); frame.setVisible(true); Button button = new Button("Button"); //将Button按钮居中放置在窗口中 frame.add(button, BorderLayout.CENTER); //事件监听,对应的事件是Button按钮被点击 //方法内的语句是Button按钮被点击之后执行的语句 button.addActionListener(new ActionListener() { @Override public void actionPerformed(ActionEvent e) { System.out.println("Button按钮被点击了"); } }); //窗体关闭设置 frame.addWindowListener(new WindowAdapter() { @Override public void windowClosing(WindowEvent e) { System.exit(0); } }); } }- 多个Button按钮共享一个事件的练习
public class ButtonActionListeners2 {
     //多个Button按钮共享同一个监听事件 public static void main(String[] args) {
      //创建并设置窗口 Frame frame = new Frame("多个事件共享一个监听事件"); frame.setBounds(100, 100, 500, 500); frame.setLayout(new GridLayout(3, 1)); //创建多个Button按钮 Button button1 = new Button("Button1"); Button button2 = new Button("Button2"); Button button3 = new Button("Button3"); //创建自定义事件监听类对象 MyActionListener myActionListener = new MyActionListener(); //将多个Button按钮与自定义事件监听类对象绑定 button1.addActionListener(myActionListener); button2.addActionListener(myActionListener); button3.addActionListener(myActionListener); //将Button按钮填充进窗口中 frame.add(button1); frame.add(button2); frame.add(button3); //关闭窗口的练习 frame.addWindowListener(new WindowAdapter() {
      @Override public void windowClosing(WindowEvent e) {
      System.exit(0); } }); frame.setVisible(true); } } / * 自己实现的Button按钮的事件监听类 */ class MyActionListener implements ActionListener {
      @Override public void actionPerformed(ActionEvent e) {
      String command = e.getActionCommand();//得到触发事件的Button按钮的名称 System.out.println(command + "被点击了"); } }
2)ActionListener 输入框监听
- 描述
- 监听文本框中输入的文字
- 按下回车就会触发该事件
- 代码练习
- 编写程序,向输入框中输入,当按下回车时,将当前文本框中的文字打印到控制台上,并清空输入框
public class TextFiledActionListeners {
     //文本框监听器 public static void main(String[] args) {
     //Main方法仅作为程序的启动器使用 /* //设置替换编码 textField.setEchoChar('*');*/ new MyTextFrame("文本框监听器的练习"); } } class MyTextFrame extends Frame {
      public MyTextFrame(String frameName) {
      //创建窗口对象并设置属性 super(frameName); this.setBounds(100, 100, 500, 500); this.setVisible(true); //创建文本框 TextField textField = new TextField(); textField.setBounds(150, 150, 50, 200); //将文本框装进窗口中 this.add(textField); //将文本框与自定义文本事件监听器绑定 MyTestActionListener myTestActionListener = new MyTestActionListener(); textField.addActionListener(myTestActionListener); //窗口关闭按钮实现 this.addWindowListener(new WindowAdapter() {
      @Override public void windowClosing(WindowEvent e) {
      System.exit(0); } }); } } / * 创建自定义的文本事件监听器 */ class MyTestActionListener implements ActionListener {
      @Override public void actionPerformed(ActionEvent e) {
     //当按下回车时,此事件触发 TextField textField = (TextField) e.getSource();//得到与之关联的文本框 String text = textField.getText();//得到文本框中输入的文本 System.out.println(text); textField.setText("");//将文本框中的文本清空 } }
3)简易计算器练习
- 问题描述
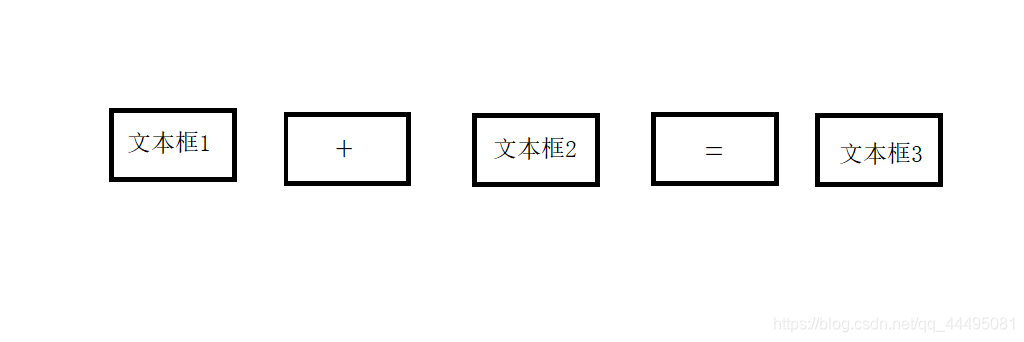
- 编写一个简易的计算器,能够计算两个数的和,窗口界面如下:
public class SimpleCalculatorExercise {
   //简单计算机练习 public static void main(String[] args) {
   //主方法只是作为启动器使用 new MyCalcFrame("简易计算器练习"); } } / * 自定义的窗口类 */ class MyCalcFrame extends Frame {
    public MyCalcFrame(String frameName) {
    //创建并设置窗口属性 super(frameName); this.setBounds(100, 100, 500, 500); this.setVisible(true); this.setLayout(new FlowLayout());//定义窗口的布局方式为流式布局 //创建3个文本框 TextField textField1 = new TextField(); TextField textField2 = new TextField(); TextField textField3 = new TextField(); //创建一个标签table Label label = new Label("+"); //创建一个按钮Button Button button = new Button("="); //将组件添加进窗口 this.add(textField1); this.add(label); this.add(textField2); this.add(button); this.add(textField3); //关联Button事件监听器 MyCalcActionListener myCalcActionListener = new MyCalcActionListener(textField1, textField2, textField3); button.addActionListener(myCalcActionListener); //窗口结束设计 this.addWindowListener(new WindowAdapter() {
    @Override public void windowClosing(WindowEvent e) {
    System.exit(0); } }); } } / * 自定义的文本事件监听器 */ class MyCalcActionListener implements ActionListener {
    private TextField textField1, textField2, textField3; public MyCalcActionListener(TextField textField1, TextField textField2, TextField textField3) {
    this.textField1 = textField1; this.textField2 = textField2; this.textField3 = textField3; } @Override public void actionPerformed(ActionEvent e) {
//获得文本框1与文本框2的数字 int num1 = Integer.parseInt(textField1.getText()); int num2 = Integer.parseInt(textField2.getText()); //将两个文本框的值的和填进第三个文本框中 textField3.setText("" + (num1 + num2)); //将前两个文本框清空 textField1.setText(""); textField2.setText(""); } }- 面向对象的写法
public class SimpleCalculatorExercise2 {
   //简单计算机练习,将窗口作为参数传递给事件监听器 public static void main(String[] args) {
   //主方法只是作为启动器使用 new MyCalcFrame2("简易计算器练习将窗口对象作为参数,"); } } / * 自定义的窗口类 */ class MyCalcFrame2 extends Frame {
    public TextField textField1, textField2, textField3;//定义成员变量,三个文本框 public MyCalcFrame2(String frameName) {
    //创建并设置窗口属性 super(frameName); this.setBounds(100, 100, 500, 500); this.setVisible(true); this.setLayout(new FlowLayout());//定义窗口的布局方式为流式布局 //创建3个文本框 textField1 = new TextField(); textField2 = new TextField(); textField3 = new TextField(); //创建一个标签table Label label = new Label("+"); //创建一个按钮Button Button button = new Button("="); //将组件添加进窗口 this.add(textField1); this.add(label); this.add(textField2); this.add(button); this.add(textField3); //关联Button事件监听器 MyCalcActionListener2 myCalcActionListener2 = new MyCalcActionListener2(this); button.addActionListener(myCalcActionListener2); //窗口结束设计 this.addWindowListener(new WindowAdapter() {
    @Override public void windowClosing(WindowEvent e) {
    System.exit(0); } }); } } / * 自定义的文本事件监听器,将窗口对象作为参数传递 */ class MyCalcActionListener2 implements ActionListener {
    private MyCalcFrame2 myCalcFrame2;//成员变量窗口对象 public MyCalcActionListener2(MyCalcFrame2 myCalcFrame2) {
   //构造方法得到窗口对象,使用窗口对象得到三个文本框 this.myCalcFrame2 = myCalcFrame2; } @Override public void actionPerformed(ActionEvent e) {
//获得文本框1与文本框2的数字 int num1 = Integer.parseInt(myCalcFrame2.textField1.getText()); int num2 = Integer.parseInt(myCalcFrame2.textField2.getText()); //将两个文本框的值的和填进第三个文本框中 myCalcFrame2.textField3.setText("" + (num1 + num2)); //将前两个文本框清空 myCalcFrame2.textField1.setText(""); myCalcFrame2.textField2.setText(""); } }- 内部类写法
- 内部类可以直接访问外部类的属性与方法,降低访问成本
public class SimpleCalculatorExercise3 {
   //简单计算机练习,使用成员内部类 public static void main(String[] args) {
   //主方法只是作为启动器使用 new MyCalcFrame3("简易计算器练习,使用成员内部类"); } } / * 自定义的窗口类 */ class MyCalcFrame3 extends Frame {
    private TextField textField1, textField2, textField3;//定义成员变量,三个文本框 public MyCalcFrame3(String frameName) {
    //创建并设置窗口属性 super(frameName); this.setBounds(100, 100, 500, 500); this.setVisible(true); this.setLayout(new FlowLayout());//定义窗口的布局方式为流式布局 //创建3个文本框 textField1 = new TextField(); textField2 = new TextField(); textField3 = new TextField(); //创建一个标签table Label label = new Label("+"); //创建一个按钮Button Button button = new Button("="); //将组件添加进窗口 this.add(textField1); this.add(label); this.add(textField2); this.add(button); this.add(textField3); //关联Button事件监听器 MyCalcActionListener3 myCalcActionListener3 = new MyCalcActionListener3(); button.addActionListener(myCalcActionListener3); //窗口结束设计 this.addWindowListener(new WindowAdapter() {
    @Override public void windowClosing(WindowEvent e) {
    System.exit(0); } }); } / * 自定义的文本事件监听器 * 内部类可以随意访问外部类的成员 */ class MyCalcActionListener3 implements ActionListener {
    @Override public void actionPerformed(ActionEvent e) {
    //获得文本框1与文本框2的数 int num1 = Integer.parseInt(textField1.getText()); int num2 = Integer.parseInt(textField2.getText()); int num3 = num1 + num2; //将两个文本框的值的和填进第三个文本框中 textField3.setText("" + num3); //将前两个文本框清空 textField1.setText(""); textField2.setText(""); } } }
4)画笔 paint
- 描述
- 可以使用画笔绘制图案,图片图标等
- 代码示例
- 绘制两个实心圆,两个空心圆,艳秋四个图案的颜色不一致
public class PaintTest {
     //画笔练习 public static void main(String[] args) {
      new MyPaint(); } } class MyPaint extends Frame {
     //自定义的画笔类 public MyPaint() {
      this.setBounds(100, 100, 500, 500); this.setVisible(true); //窗口关闭按钮 this.addWindowListener(new WindowAdapter() {
      @Override public void windowClosing(WindowEvent e) {
      System.exit(0); } }); } @Override public void paint(Graphics g) {
      g.setColor(Color.RED);//设置画笔颜色 g.drawOval(150, 150, 50, 50);//绘制空心圆,参数分别是位置与圆的大小 g.setColor(Color.YELLOW); g.fillOval(200, 150, 50, 50);//绘制实心圆 g.setColor(Color.BLUE); g.fillOval(150, 200, 50, 50); g.setColor(Color.GREEN); g.drawOval(200, 200, 50, 50); g.setColor(Color.BLACK);//使用完画笔之后,将画笔的颜色还原为黑色 } }
5)MouseListener 鼠标监听
- 描述
- 用来接收于鼠标相关的事件(按下、释放、双击等)的监听器
- 代码示例
- 使用鼠标在花瓣上画点,单击实现
public class MouseMonitors {
     //使用鼠标在窗口上绘制点 public static void main(String[] args) {
      new MyFrame("我的画板"); } } class MyFrame extends Frame {
     //创建我的窗口类 ArrayList<Point> points;//定义点集合 public MyFrame(String frameName) {
      super(frameName); this.setBounds(100, 100, 500, 500); this.setVisible(true); points = new ArrayList<>(); / * 将鼠标点击事件的实现 * 将窗口与鼠标单机事件连接起来 */ this.addMouseListener(new MouseAdapter() {
      @Override public void mouseClicked(MouseEvent e) {
      MyFrame frame = (MyFrame) e.getSource(); points.add(e.getPoint());//得到鼠标点击时点的坐标,并添加进点集合中 frame.repaint();//鼠标每点击一次,就让画板上的点重新画一次,让新的点刷新出来 } }); / * 负责窗口关闭按钮功能的实现 */ this.addWindowListener(new WindowAdapter() {
      @Override public void windowClosing(WindowEvent e) {
      System.exit(0); } }); } / * 画笔、负责绘制集合中的点 */ @Override public void paint(Graphics g) {
      Iterator<Point> iterator = points.iterator();//获得集合的迭代器 while (iterator.hasNext()) {
     //遍历点集合,并画出来 Point point = iterator.next();//得到点 g.setColor(Color.red); g.fillOval(point.x, point.y, 20, 20);//绘制用户点击的点 } } }
6)WindowListener 窗口监听
- 描述
- 用于接收窗口事件的监听器
- 代码练习
- 实现窗口的关闭按钮,当窗口被激活时,改变窗口的标题
public class WindowListeners {
     //窗口监听的练习 public static void main(String[] args) {
      new MyWindowFrame("我的窗口监听的练习"); } } / * 自定义窗口类 */ class MyWindowFrame extends Frame {
      public MyWindowFrame(String title) throws HeadlessException {
      super(title); this.setBounds(100, 100, 500, 500); this.setVisible(true); //将窗口与窗口监听事件绑定 this.addWindowListener(new WindowAdapter() {
      //窗口关闭 @Override public void windowClosing(WindowEvent e) {
      System.exit(0); } //窗口激活,得到焦点 @Override public void windowActivated(WindowEvent e) {
      MyWindowFrame frame = (MyWindowFrame) e.getSource(); frame.setTitle("被激活的窗口"); } }); } }
7)KeyListener 键盘监听
- 描述
- 接听键盘事件的监听器
- 代码练习
- 当用户按下的方向键时,在控制台打印用户按下了什么键,否则输出用户按下键的键值
public class KeyboardMonitors {
     //键盘监听的练习 public static void main(String[] args) {
      new MyKeyboardFrame("键盘监听的练习"); } } / * 自定义的窗口类 */ class MyKeyboardFrame extends Frame {
      public MyKeyboardFrame(String total) {
      super(total); this.setBounds(100, 100, 500, 500); this.setVisible(true); / * 将键盘与窗口绑定起来 */ this.addKeyListener(new KeyAdapter() {
      //与键盘按下事件相对应 @Override public void keyPressed(KeyEvent e) {
      int keyCode = e.getKeyCode();//得到按下的键对应的值、 //除了方向键打印具体的键,其他键打印键值 if (keyCode == KeyEvent.VK_UP) {
      System.out.println("你按下了方向上键"); } else if (keyCode == KeyEvent.VK_DOWN) {
      System.out.println("你按下了方向下键"); } else if (keyCode == KeyEvent.VK_LEFT) {
      System.out.println("你按下了方向左键"); } else if (keyCode == KeyEvent.VK_RIGHT) {
      System.out.println("你按下了方向右键"); } else {
      System.out.println("你按下的键的值是:" + keyCode); } } }); //设置窗口关闭按钮 this.addWindowListener(new WindowAdapter() {
      @Override public void windowClosing(WindowEvent e) {
      System.exit(0); } }); } }
免责声明:本站所有文章内容,图片,视频等均是来源于用户投稿和互联网及文摘转载整编而成,不代表本站观点,不承担相关法律责任。其著作权各归其原作者或其出版社所有。如发现本站有涉嫌抄袭侵权/违法违规的内容,侵犯到您的权益,请在线联系站长,一经查实,本站将立刻删除。 本文来自网络,若有侵权,请联系删除,如若转载,请注明出处:https://haidsoft.com/120711.html


